From Whole Beans to Your Daily Brew: A Manual Coffee Grinder with Silver Finish, Black Grip & Warm Wooden Crank Handle
From Whole Beans to Your Daily Brew: A Manual Coffee Grinder with Silver Finish, Black Grip & Warm Wooden Crank Handle
Couldn't load pickup availability

🫘 Your Coffee Story Starts Before the First Pour
Before the kettle is lifted, before the coffee meets the water, there is a smaller moment worth noticing: whole beans becoming grounds. This manual coffee grinder brings you into that part of the process, with a hand-operated crank, a distinctive black grip and a clear glass jar that keeps the results in view.
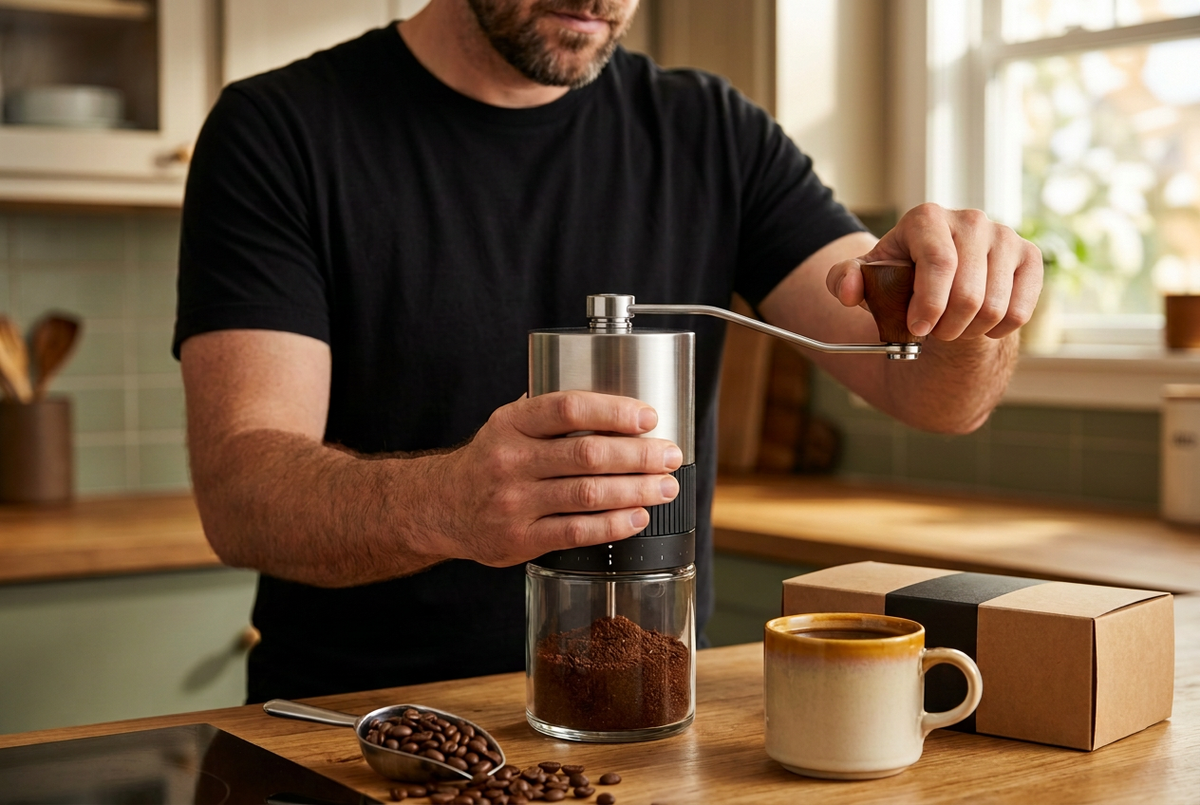
Its design is built around contrast. The silver-colored upper body catches the light. A wide band of black vertical ribbing adds texture at the center. Beneath it, the transparent collection jar reveals the coffee gathering inside. Above, a long bent crank reaches outward to a warm brown wooden knob, giving the grinder its unmistakable silhouette.
This is not another invisible step between you and your cup. It is a hands-on beginning: measure your beans, prepare the grinder, turn the handle and watch the grounds collect. A familiar routine becomes something you take part in from the start.
A distinctive addition to your coffee setup, $52.00 USD.
👋 Meet the Details Your Hands Will Notice
The wooden knob: the warm point of contact
The crank ends in a generous brown wooden knob with a rounded, cup-like profile. Its grain provides a softer visual contrast to the silver-colored arm. Rather than introducing another black component, it adds warmth exactly where your hand meets the turning mechanism. The shape and finish make it a detail you notice both during use and when the grinder is standing on the counter.
The ribbed band: a defined place to hold
A broad black band wraps around the middle of the body, with closely spaced vertical ridges. This textured section gives the grinder a clearly defined holding area and a strong visual break between the reflective upper cylinder and transparent lower jar. Hold the body securely during operation and follow the supplied instructions for the appropriate hand position.
The clear jar: the process in plain sight
Ground coffee collects in the glass jar below. You can see the pile grow instead of guessing what is happening inside an opaque container. The clear lower section also adds a lighter note to the design, balancing the darker middle band and letting the coffee itself contribute its rich brown color.
The finishing touches: small marks, clean lines
A narrower black band beneath the ribbed grip carries small light-colored reference marks. A central top fitting connects the long crank to the body, while the arm bends gently outward toward the wooden knob. The marks and fittings are visible design details; an exact adjustment range or numbered setting system is not inferred from the photograph.
🌱 Scene One: A Kitchen Routine with a Hands-On Beginning

In a warm kitchen, the first preparation can be the simplest pleasure. Set out your coffee tools, choose the beans you want to brew and leave enough room for the crank to turn freely. One hand steadies the body while the other guides the wooden knob. Beneath the grip, the glass jar keeps the grounds visible as you work.
There is something satisfying about seeing the starting ingredient change in front of you. The grinder gives that transformation a clear visual rhythm: the silver arm moving, the wooden knob turning and the coffee accumulating below. You do not need an elaborate coffee station to enjoy it. A stable work area and a routine you understand are a good place to begin.
The cream knitwear, walnut surface and muted green background in this scene bring out the warmer side of the design. The grinder remains the focal point, with its original silver finish preserved rather than recolored to match the room.
⚙️ The Bean-to-Brew Workflow
- Inspect and prepare. Check the grinder, crank connection and glass collection jar before use. Follow the supplied assembly instructions and confirm that the components are correctly seated.
- Choose a measured portion. Start with an amount of coffee appropriate for your recipe and the grinder's confirmed capacity. Avoid overfilling, and use the loading procedure specified by the maker.
- Match the setup to your brew. If adjustment is supported, use the documented method and recommended starting point for your brewing style. Do not guess the function of a ring or force a component based only on its appearance.
- Find a steady turning rhythm. Hold the body securely and rotate the crank as directed. Keep fingers clear of moving connections. If the grinder catches or becomes unusually difficult to turn, stop instead of applying excessive force.
- Check the collected grounds. Look through the glass jar to see the coffee below. Follow the instructed removal method when transferring grounds, keeping the jar supported so it cannot slip or fall.
- Continue to your brew. Measure the prepared coffee for your chosen recipe, then keep a note of what you used. The grinder is one part of the process; your beans, water and brewing technique also shape the cup.
Think of your first attempt as a baseline rather than a test to pass. Keep the amount of coffee consistent, learn the operating procedure and change one variable at a time. A useful routine is one you can repeat comfortably, not one that requires you to guess what worked.
📝 A Coffee Notebook Beats a Guess
Write down three things after brewing: the coffee you used, the preparation method and one observation about the cup. Keep those notes short. You might notice that a different roast suits your breakfast better, or that your pouring technique changes the result more than expected.
If the grinder has verified settings, record the setting using the maker's terminology. Do not substitute an invented click count or assume that the visible marks correspond to a particular brewing method. Keeping notes tied to the actual instructions gives you a clearer starting point for the next cup.
This is where a manual coffee routine becomes personal. It is not about chasing a universal setting or a guaranteed flavor. It is about understanding your own ingredients and preferences well enough to make a cup you enjoy again.
🎯 Scene Two: Set Up, Grind and Make the Cup Yours

A darker shirt, a cream cup and a handful of beans give the same grinder a different mood. The reflective upper body stands out against black, while the wooden knob connects with the brown coffee and countertop. This scene shows how one consistent product can feel at home in a bolder coffee setup without changing its design.
Keep your preparation area organized around the sequence you actually use. Beans first. Grinder within comfortable reach. Brewer and cup ready for the next step. Leave space around the extended crank, and put delicate glass pieces where they will not be knocked by other tools.
The pleasure is not only in the finished coffee. It is also in having a setup that makes sense: tools you recognize, steps you understand and a few moments of attention before you begin the rest of your day.
🧺 A Richer Palette, Without a Busier Counter
Anchor the scene in coffee brown and black. Use a dark tray or walnut surface to echo the grounds and ribbed band. Let the silver finish remain a bright focal point rather than trying to hide it.
Bring in cream for breathing room. A pale cup or folded linen balances the dark components and separates the product from the background. The transparent jar keeps the bottom of the design visually light.
Add color in small amounts. Sage green and amber accents complement the wood without taking over the composition. One cloth, plant or glass vessel is enough to introduce another layer.
Cups, coffee beans, brushes, jars and decorative items in the photographs illustrate a styled setting. They are not an included accessory list. The plain kraft packaging with a black band is a coordinated visual concept, not a verified specification of the shipped packaging.
🌿 Clear Expectations Before You Choose
Does it require an electrical connection?
This is a hand-crank coffee grinder. The pictured operating method uses manual turning rather than an electric motor.
What materials and specifications are confirmed?
The reference shows a silver-finish upper body and crank, a black textured middle section, a brown wooden knob and a clear glass grounds jar. Exact metal composition, burr material, capacity, dimensions and weight are not established by the image alone.
Is it guaranteed to suit espresso or every brewing method?
No universal brewing compatibility or grind-performance guarantee is claimed here. Check the documented grind range and the requirements of your brewer before choosing it for a specific method.
How should I clean it?
Follow the supplied care and disassembly instructions. Do not assume that the complete grinder is washable, dishwasher-safe or suitable for immersion. Treat the glass jar and wooden knob with care, and only remove components as instructed.
The First Turn Is Yours
A cup of coffee has more than one beginning. There is the moment you choose the beans, the moment you prepare the grounds and the moment you finally sit down to enjoy it. This manual grinder makes that middle step tangible, with visible grounds, a distinctive crank and contrasting textures you can appreciate each time you use it.
Give it a place in your coffee routine. Learn its operation, pair it with your preferred brewing method and let the process become as familiar as the cup itself.